

A nice bracket clock from the early 1700s. These old clocks have been worked on many times.
One of my practical work assignments of late is to do what we call a verge re-conversion on a nice old bracket
clock from about the mid 1700s, made by James Snelling. These old clocks, before the anchor-recoil escapement was invented, used what we call a verge escapement. Later, after the pendulum was invented, many clock owners wanted their clocks converted to use a pendulum as a regulator because they keep better time (a point under some debate in horological circles). In any case, nowadays, many current clock owners are wanting their clocks of this era converted back to “the way it was”. Much debate about this process also–do we really know “how it was”? In many ways we are really just adding to the history of the clock not taking it back to something. In any case, as an educational experience it is very instructive so this re-conversion is what I am doing. The re-conversion process involves making new wheels (gears) and their associated mounting pieces–in my case this will also involve making a pendulum and crutch which uses a rise and fall mechanism to adjust the rate–so a little bit more complicated than might be typical.
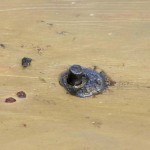
As is usual with most clocks, you can’t ever get around to doing what you want without first having to fix a few other problems. As I was taking apart my clock to get to see what things looked like inside, the center wheel came off leaving the pivot in place in the back plate.

Here is the inside of the clock-the center arbor is the one in the middle that looks like it is tipping over.
OK, a pivot is the little end part of the clock wheel’s axle (called an arbor)–the pivot is the part that holds the wheel in place as it rotates. Hopefully the pictures help you with seeing this. Before I can begin work on the re-conversion, I need to put a new pivot into this arbor. If things are bad enough you have remake the whole gear. In my case, I am going to try to reinsert a new pivot into the arbor end – if that does not work, I will have to make an entirely new gear assembly.
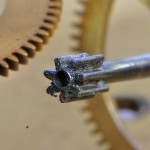
The pinion (star gear) with the pivot missing.
The pivot is stuck in the front plate!
In looking at the clock I noticed that the old pivot was still there–it was actually stuck in the plate, held there by old mucky oil that had gotten dirty and sticky–apparently the last person that worked on this clock tried to do the very same job of replacing the pivot but didn’t do it well enough and it literally fell out!
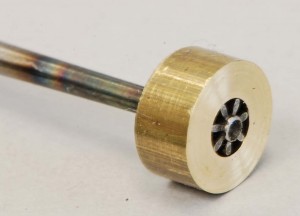
The brass bushing helps make sure that the pinion will not split as I work on inserting the pivot.
The first thing to do is get it clean–white spirits with a lot of careful brushing. Then make a brass bushing to go around the pinion (the part that looks a little like a star wheel). The pinion is vulnerable to splitting as I am poking a new pivot in and out of the arbor–so this just makes sure that the arbor does not split and make things more difficult.
The right end of this wire fits nicely into the arbor. Here I am just about to cut off the small bit that I am going to use.
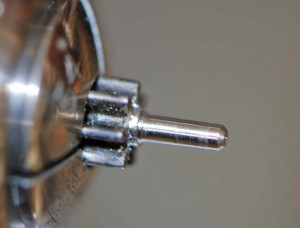
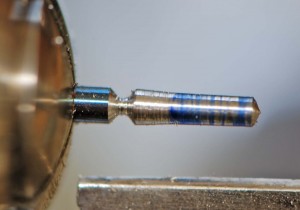
The pivot has been soldered in to the end of the arbor and I have turned it to be concentric.
The next thing to do is to turn down the end of a piece of blued pivot wire until it fits nicely in the hole without having to be jammed in too hard. Then, soft solder that piece of wire into the end of the arbor being careful not to heat the pinion too much–the pinion is made from somewhat hard metal and heating it too much will ruin the hardness and make it susceptible to premature wear.
Finally, I had to get the wire nice and round and importantly, concentric with the wheel. I do this on the lathe but it is challenging because of the small size (the pivot is about 5 mm long and 1 mm in diameter) and because the pivot wire is hard steel–it takes a very sharp graver and some careful turning to get this concentric.
Once concentric you are almost home except for getting as good a polish on the pivot as possible. The pivot is the part that turns in the clock plate so it should be as polished, low friction, as possible. I made a couple polishing tools to help with this, the first was a piece of steel that I flattened and the second a piece of boxwood. After making the tools, put some medium diamond paste on the steel tool and hold it on the pivot whilst turning in the lathe and then follow-up the same thing with fine diamond paste using the boxwood stick.

The polished pivot ready to be used.
DONE! – now we are ready to move on. Oh well almost, – I forgot to say that in order to do the pivot, I had to remove the wheel, which I was going to replace anyway, so I made a new wheel too–but that’s another process, I will share in a subsequent post.
cheers,
7 comments
Skip to comment form
Author
Thanks. It is a lot of work right now and will be for the next five months–Masters degrees don’t come cheap but I know that I will be glad we did it when it is all finished.
Mostyn,
Really enjoyed your detailed analysis of what you’re doing. Frankly, I don’t understand a word of it but I love your enthusiasm!
Mark Mohr
Author
Glad you enjoyed it. I have a diverse audience–I am glad that some non-clock person can appreciate it.
So facinating! And so well written…
Was the set-up, after the first conversion, a pendulum with verge escapement or had the original;conversion entailed an anchor escapement as well? I have a pendulum with verge by Daye Barker; but I am sure that he made it that way. The date is about 1750 so he could have used an anchor escapement and I have wondered why he didn’t.
Interesting stuff! Ginger
Author
Hi ginger,
Thanks for reading. The first conversion was from pendulum with verge to pendulum with anchor. Even though the anchor escapement was invented in the late 1600s, many clocks–in fact many good quality clocks–were still built with the verge escapement. Many clockmakers think the verge escapement is a terrible timekeeper but it doesn’t have to be as bad as might be imagined, in fact, some believe it to be quite good. Lots of debate over here about it.
best,
I’m glad there are those who are preserving some of the history and understanding of the processes of such amazing instruments. I’m also glad you are enjoying your time there, too…..What a wonderful experience for you!!! All the best to you and Debbi! We miss you!